
Handy Cardmaking Tips

by JCraft | 6 minutes, 32 seconds read
Cardmaking is a fun and enjoyable hobby you can utilise for making greeting cards, birthday cards, or cards for any occasion. Whether you’re a cardmaking novice or a seasoned enthusiast, I’ll guide you in creating pieces that leave a lasting impression. Here are some tips that come in handy when getting started;
Invest in quality supplies
Being a good card maker requires the right supplies and tools to get the job done. Look at the basic tools you need at any given time.
-
Card stock: This is the foundation of your card and is available in various colours and textures. It also comes in different thicknesses, and you can pick the one that’s strong enough to hold your embellishments, folds, or cuts. Using white cardstock is always a good start if you aren’t sure, as it gives you a clean slate to start with.
-
Die-cutting gadgets: Manual and electric are two types of die-cutters. The manual die cutters are affordable and lightweight and should work in most cases. You use die-cutting machines to cut, engross, or engrave your card. Making intricate patterns like flowers without a die-cutter is time-consuming and hard.
-
Adhesives: You will need some type of adhesive to hold your card and details together. A basic glue stick might work for lightweight card embellishments like paper or ribbon. However, consider double-sided adhesive foam tape or liquid adhesive for heavier items or a more permanent hold.
-
Cutting tools: Cardmaking involves a lot of cutting, and each needs to be precise. Invest in sharp craft knives and scissors ensures clean, precise cuts that elevate the overall look of your card.
Don’t skimp on essentials
Quality materials last longer, so your card won’t fall apart, allowing the card recipients to enjoy the message longer. They’re also easier to work with and make cardmaking more fun and your creations more consistent. Using quality materials shows you care about the card and the person you’re giving it to, just like you put thought and effort into making it special.
Experiment with techniques
Making cards is all about having fun and being creative. Don’t be afraid to try new things! Here are a few ways you can try out new techniques:
-
Blend different ink colours for a cool background that looks like a dream.
-
Emboss your cardstock to add a raised, 3D effect that’s fun to see and touch.
-
Use different coloured papers on top of each other to create depth and drama in your design. The more you play around with different techniques, the more unique your cards will become.
This is your style, just the way you want it. Even if something doesn’t turn out exactly how you imagined, it’s still a learning experience. You’ll discover new things about the materials you’re using and develop your own unique cardmaking style.
Attend a craft show
Craft shows are an excellent place to gather tons of ideas, find new stuff to use, and learn different cardmaking techniques. You also get to meet other people who love making cards just like you.
Many shows even have workshops where you can try out new techniques. In addition, the whole place is buzzing with creative energy, which is sure to get your own inspiration flowing again. Find a craft show near you like the ones organised by Craft Alive, and it could be the perfect way to discover awesome new things for your next cardmaking project.
Take a cardmaking class
Do you feel like you want to take your cardmaking to the next level? Consider taking a cardmaking for beginners class! Here’s why it’s a great idea:
-
Classes are led by experienced crafters who can teach you valuable cardmaking techniques, tips, and tricks. You’ll get step-by-step, guidance ensuring you create beautiful cards you’ll be proud of.
-
Classes can introduce you to new techniques like using rubber stamps, heat embossing, paper crafting, or ink blending. Expanding your cardmaking repertoire, you’ll learn how to use different tools and materials.
-
Being surrounded by other enthusiastic card makers is a great way to spark your creativity. It’s a fun and social environment that can keep you motivated and keep those creative juices flowing.
So, if you’re ready to learn new skills, get inspired with new card design ideas, and create stunning cards, sign up for a cardmaking class today!
Never give up it’s only paper
At the end of the day, remember it’s only paper. If a project isn’t going the way you planned, it’s no big deal. Every misstep is a chance to learn something new or to stumble upon an unexpected design you love. Getting too hung up on perfection can stifle creativity. So, if you cut something too short or your design doesn’t come out as picture-perfect as you hoped, just laugh it off and start again.
The beauty of cardmaking is that it’s all about creativity and having fun. Don’t be afraid to experiment, make mistakes, and learn from them. Keep practising, keep exploring, and don’t let a little setback stop you. Remember, every card you create uniquely expresses yourself and your love for the recipient.
Final thoughts
I hope these tips will help you get started and enjoy cardmaking. Remember, cardmaking is all about expressing yourself, so don’t be afraid to create those birthday cards for your loved ones. After all, a handmade card is worth a thousand well-wishes (and maybe a few giggles too)! Happy cardmaking!
Card examples for inspiration

For this card, I used a pretty Julie Hickey Designs stamp, then die cut out the letters also Julie Hickey Designs, then I put the card stock through an embossing folder (without the letters). Next I assembled the layers of the card and inserted the letters using foam tape, which gives it the dimension.

This card has quite a lot of detail in it, I started with a card base folded in half, I then cut out a half circle from the middle on the folded edge, next I cut a fancy scalloped circle DieCut with the centre removed and placed it on the front of the card, this gave the illusion of a handle. Next, I added a simple piece of cardstock and used a pretty Spellbinders embossing folder which kept it simple, the main focal was all the flowers, for these, I used a mix of paper, velum and Foamiran and added some leaves cut from
mirror card, I then arranged and glued down with a hot glue gun, added a few sequins and some ribbons, it was then complete.
Something to remember: when you make a card with lots of embellishments, it can get quite heavy and doesn’t stand too well, to avoid this reinforce the inside of your card with a couple of matted layers and then stamp your verse or write your message
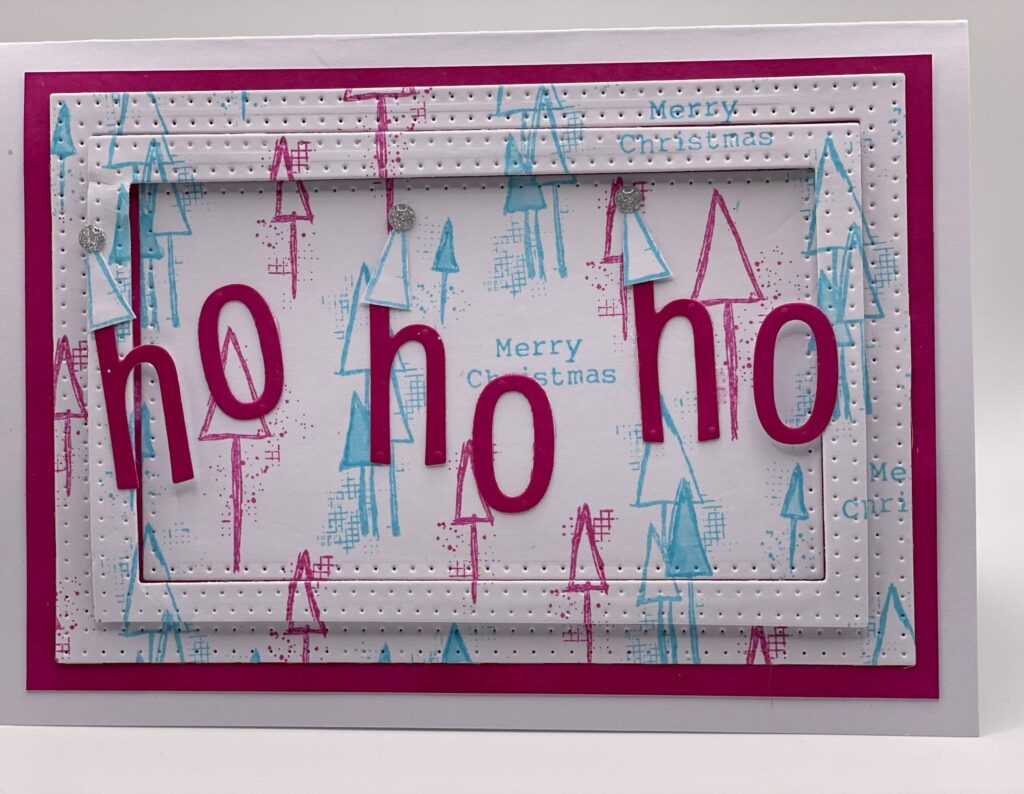
This card goes back to Christmas in design, but worth mentioning the method I have used. Good quality stamps will stamp nice crisp clean images, and with this in mind, I stamped a 12 x 12” piece of white cardstock randomly with a stamp set that has a few coordinating stamps all in the same set, I used different ink colours (which just happen to be Jcraft colours haha). I then cut an oblong frame out and raised it with some foam tape, added a few letters, and that was my card done. So not only can you use your stamps on small pieces of cardstock you can make larger sizes and cut them up to suit your project. We always have so many samples with us when we attend our craft shows it is worth coming for all the inspiration.
I hope this blog has given you some useful ideas and tips for your cardmaking, it has been fun to put together, and I know I need to do more like this.
Recent Stories
Craft Industry Trends for the Start of 2025
by Craft Alive | 5 minutes, 14 seconds read
Understanding Local Craft Fairs: A Guide
by Craft Alive | 5 minutes, 9 seconds read

Finding Local Craft Fairs: Tips and Resources
by Craft Alive | 5 minutes, 12 seconds read
Send Us a Message
"*" indicates required fields


